Standing up a full SDA Underlay Fabric with VS Code, Copilot and CML MCP
What if you could deploy a full SDA underlay fabric lab — 15 nodes, 20 point-to-point links, OSPF, loopbacks, SNMP — in under 10 minutes using natural language?
That’s exactly what I did using VS Code with GitHub Copilot and the cml-mcp server. Instead of clicking through CML menus, manually creating nodes, connecting interfaces, planning IP addresses, and configuring each device one by one — I drew a topology in draw.io, attached it to Copilot, typed one prompt, and watched it build the entire lab.
MCP (Model Context Protocol) is a standard that allows AI assistants to interact with external tools and services. The cml-mcp server — created by Joe Clarke (@xorrkaz) — gives your AI assistant a direct API connection to Cisco Modeling Labs (CML). It translates natural language into CML API calls — no scripts, no templates, just a conversation.
Here is a quick outline:
- What components and environment you need.
- How to configure the MCP server in VS Code (
mcp.json). - The exact prompt I used to build the topology.
- Time comparison: manual vs MCP.
- Verifying the lab was built correctly.
Components used
- VS Code v1.128.0 — IDE with built-in Copilot agent mode.
- GitHub Copilot — AI assistant using Claude Sonnet 4.5 as the model.
- cml-mcp — MCP server for Cisco Modeling Labs (by Joe Clarke / @xorrkaz). Provides 51 tools for lab management, node configuration, link management, annotations, and more.
- Cisco Modeling Labs (CML) v2.10 — network simulation platform.
- CML Reference Platform images:
refplat-20260409-fcs-iso.zipandrefplat-20260611-supplemental-iso.zip. - Node type used: BETA CAT9000v UADP (Cisco Cat9300 IOS-XE switch).
- draw.io — for designing the topology that becomes the input to the prompt.
Code break down (mcp.json)
The mcp.json file tells VS Code how to launch and connect to the CML MCP server. You can find this file by going to VS Code → Settings → search “MCP” → Edit in settings.json, or directly editing your workspace .vscode/mcp.json.
{
  "servers": {
    "Cisco Modeling Labs CML": {
      "type": "stdio",
      "command": "uvx",
      "args": [
        "cml-mcp[pyats]"
      ],
      "env": {
        "CML_URL": "https://<YOUR_CML_SERVER_IP>",
        "CML_USERNAME": "<YOUR_USERNAME>",
        "CML_PASSWORD": "<YOUR_PASSWORD>",
        "CML_VERIFY_SSL": "false",
        "PYATS_USERNAME": "<DEVICE_USERNAME>",
        "PYATS_PASSWORD": "<DEVICE_PASSWORD>",
        "PYATS_AUTH_PASS": "<DEVICE_ENABLE_SECRET>",
        "DEBUG": "false"
      }
    }
  }
}
Line-by-line explanation:
type: "stdio" — the MCP server communicates via stdin/stdout. VS Code manages the process lifecycle.
command: "uvx" — uses uv to automatically download and run the MCP server without manual installation. If you get “command not found”, use the full path (run which uvx in your terminal).
args: ["cml-mcp[pyats]"] — the [pyats] extra installs PyATS support, enabling CLI command execution directly on lab devices (e.g., show ip ospf neighbor). Without it, you can still create labs and manage topology, but cannot run commands on devices.
CML_URL — your CML server address (e.g., https://10.x.x.x or https://cml.example.com).
CML_USERNAME / CML_PASSWORD — your CML login credentials.
CML_VERIFY_SSL: "false" — CML ships with a self-signed certificate by default. Set to "true" only if you have installed a CA-signed certificate.
PYATS_USERNAME / PYATS_PASSWORD / PYATS_AUTH_PASS — credentials for device-level SSH/console access via PyATS. These are the local credentials configured on your lab devices (not CML server credentials).
DEBUG: "false" — set to "true" for verbose MCP server logging when troubleshooting.
The Prompt
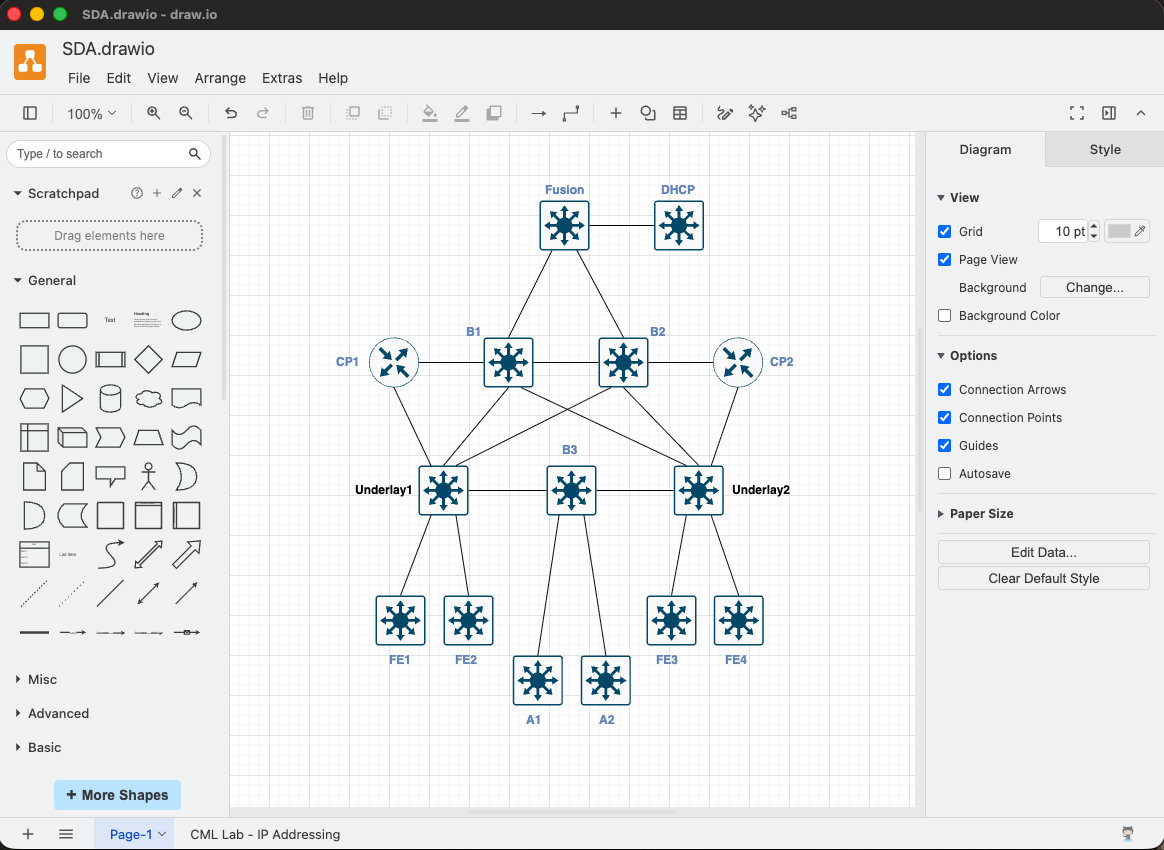
This is the key part — the prompt I gave Copilot with the SDA.drawio file attached as context. I used page 1 of the draw.io file which contained the topology design (node roles and link connections). Copilot parsed the XML to understand the structure.
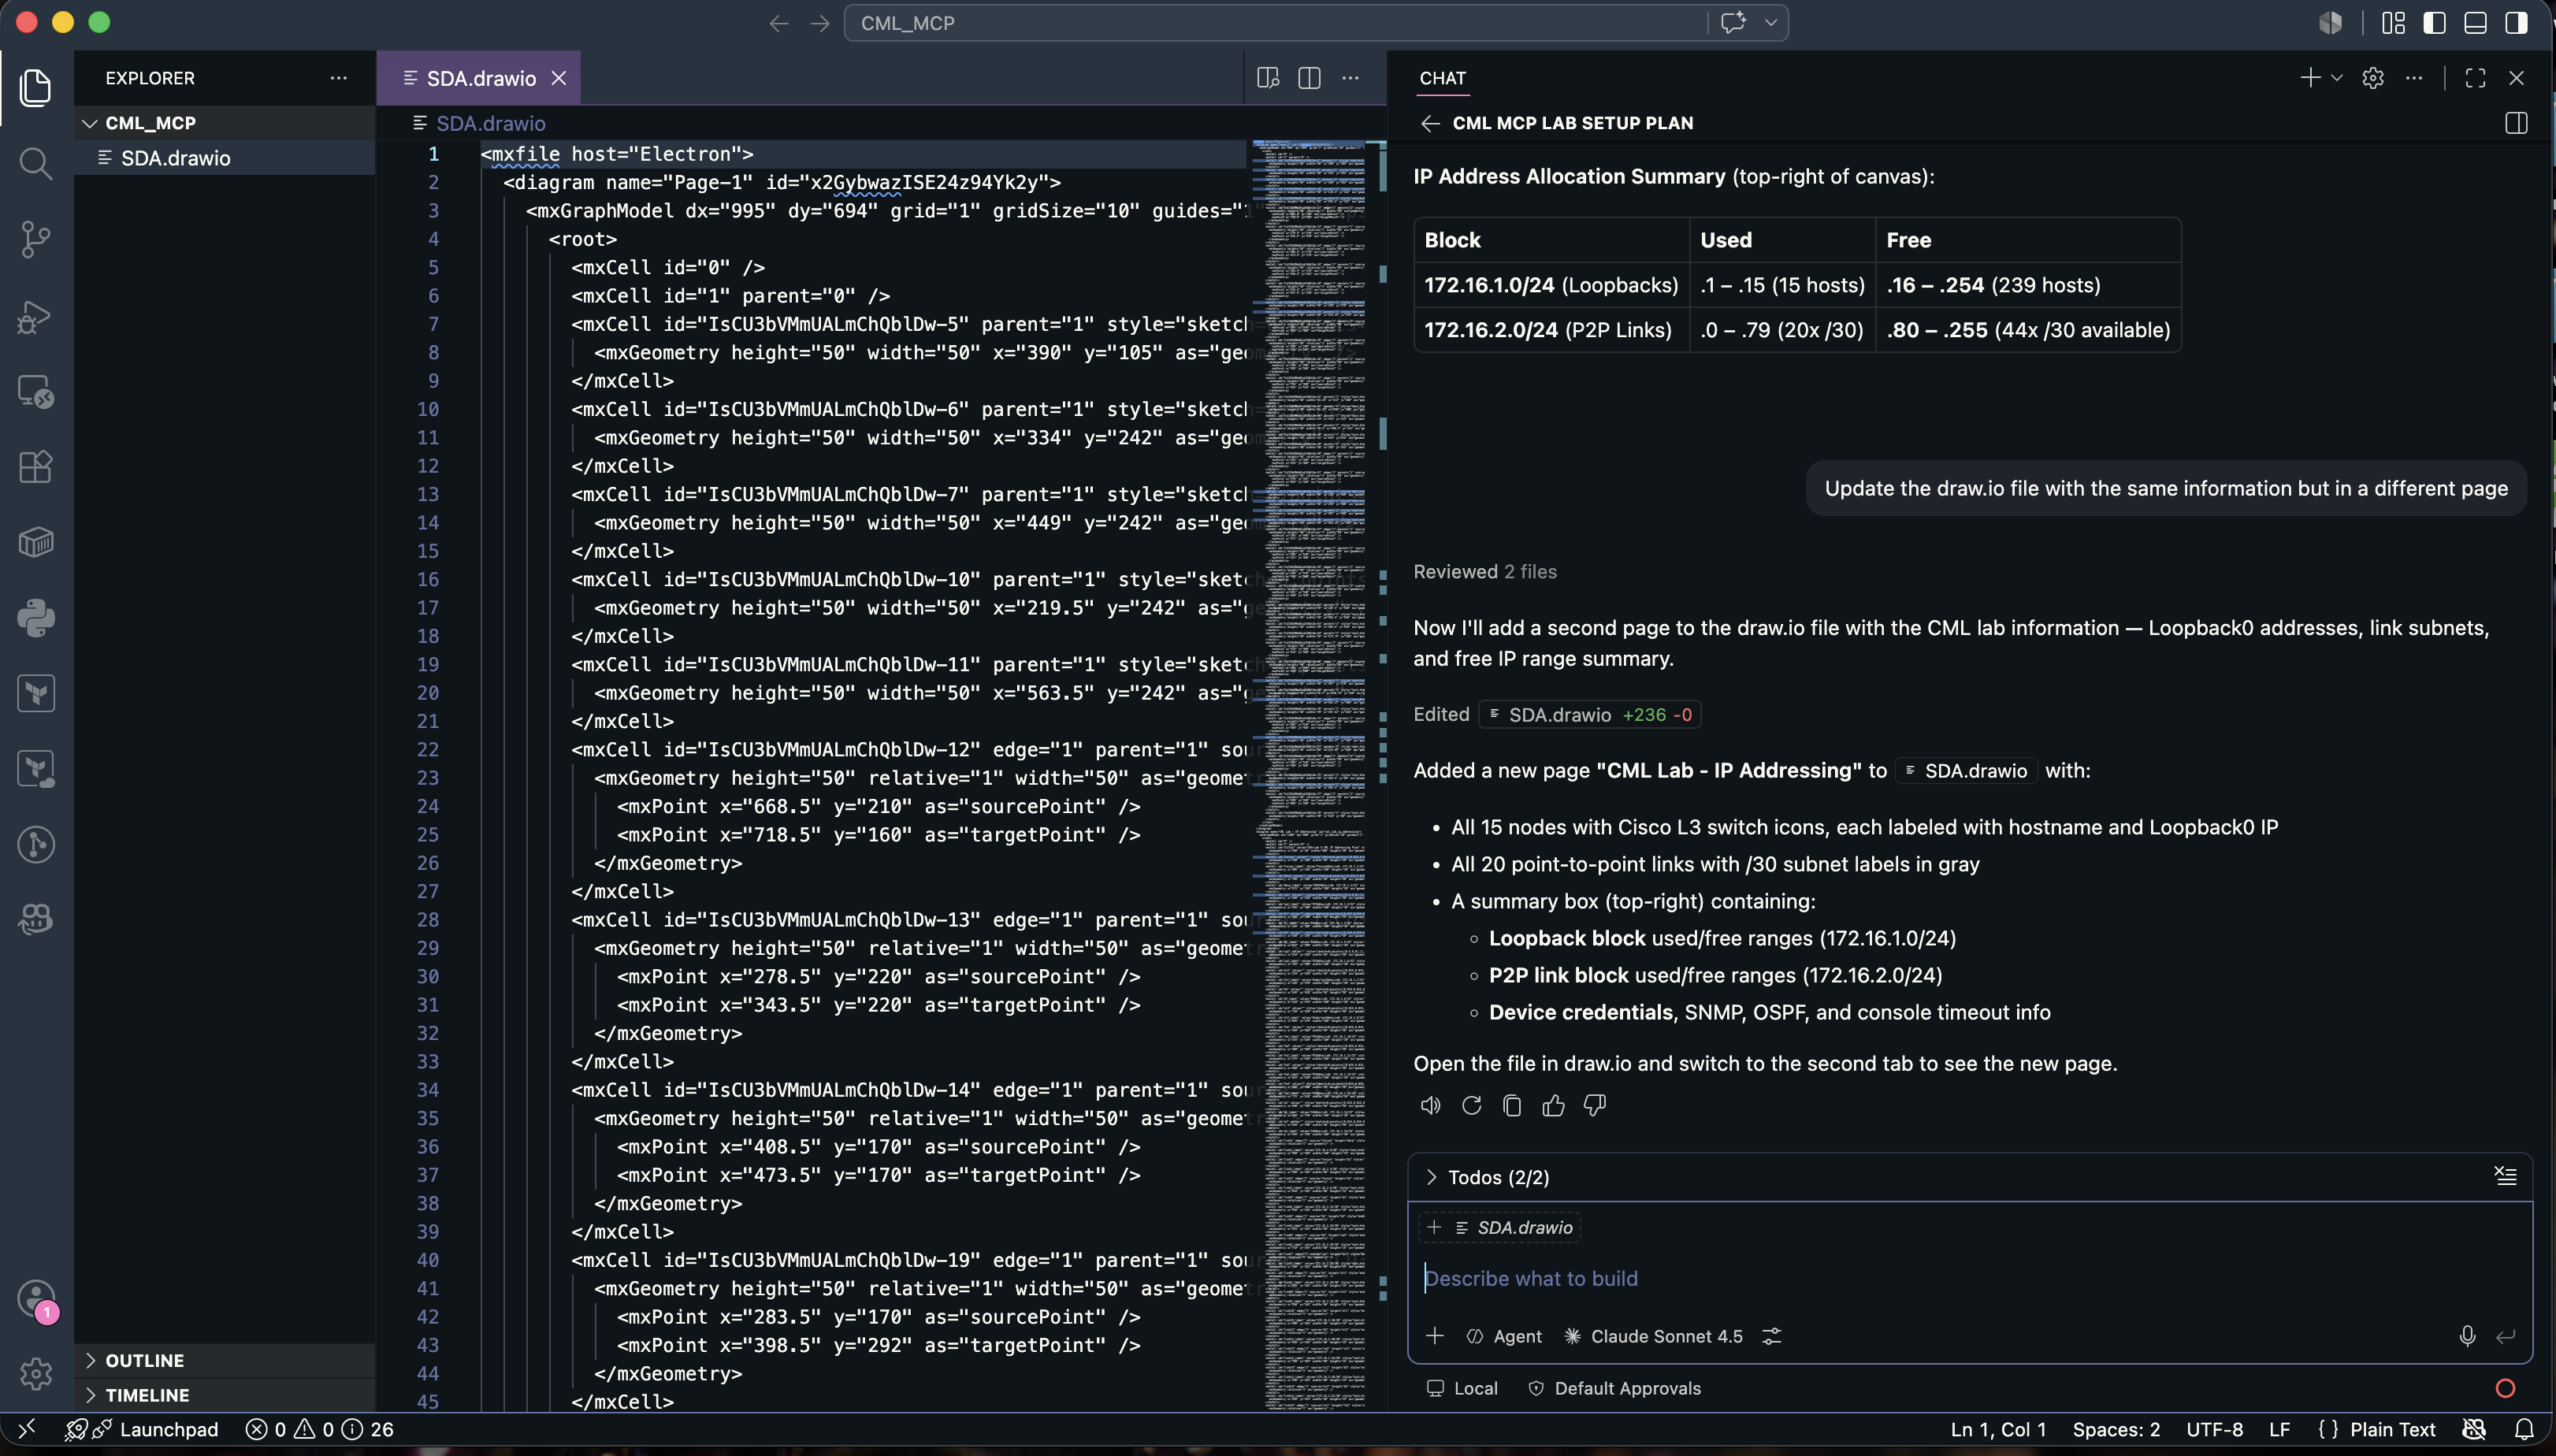
Here is the sample prompt:
1
2
3
4
5
6
7
8
9
10
11
12
13
14
Create a lab based on the attached @SDA.drawio diagram.
All links are point-to-point — assign /30 subnets from the 172.16.2.0/24 block.
Do not use the Gig 0/0 interface.
Each node should be "BETA CAT9000v UADP" (Cisco Cat9300 IOS-XE switch).
Configure Local username: cisco
Configure Local password and enable secret: cisco!123
Enable OSPF on all interconnecting interfaces.
Each device gets a Loopback 0 interface addressed from the 172.16.1.0/24 block.
Configure SNMP v2c Read-Only community: RO.
Set console timeout to 1 hour.
Use logical IP addresses, lowest to highest starting from the top of the diagram.
After building, update the CML lab topology annotations with Loopback 0 addresses. Label point-to-point links with the subnet used.
Add a second page to the draw.io file summarising loopback addresses, link subnets, and free IP ranges.
Ask question if unsure.
Tips:
- Attaching the
.drawiofile as context is critical — Copilot reads the XML and extracts node names, roles (Fusion, Border, CP, Underlay, Fabric Edge, Access), and link connections. - Being specific about IP addressing schemes and credentials upfront saves iteration.
- The “lowest to highest starting from the top” instruction helps Copilot assign IPs in a logical order matching the diagram hierarchy.
Time Comparison: Manual vs MCP
| Task | Manual | MCP + Copilot |
|---|---|---|
| Design topology (draw.io) | ~15 min | ~15 min (same — you still design) |
| Create lab + 15 nodes in CML | ~20 min | Included in ~10 min |
| Create 20 links + connect interfaces | ~30 min | Included |
| IP addressing plan (loopbacks + P2P) | ~15 min | Included |
| Configure all 15 nodes (OSPF, SNMP, credentials, console timeout) | ~40 min | Included |
| Annotate topology + documentation | ~10 min | Included |
| Total | ~2 hours | ~10 minutes |
The design step is the same — that’s your engineering intent and it stays with you. Everything after that is execution, and MCP handles all of it. The difference is a 12x speedup on the repetitive, error-prone provisioning tasks.
What makes this especially powerful: if you need to tear it down and rebuild with changes (different IP scheme, different node count, different protocols), it’s another 10-minute conversation — not another 2 hours.
Verifying the Lab
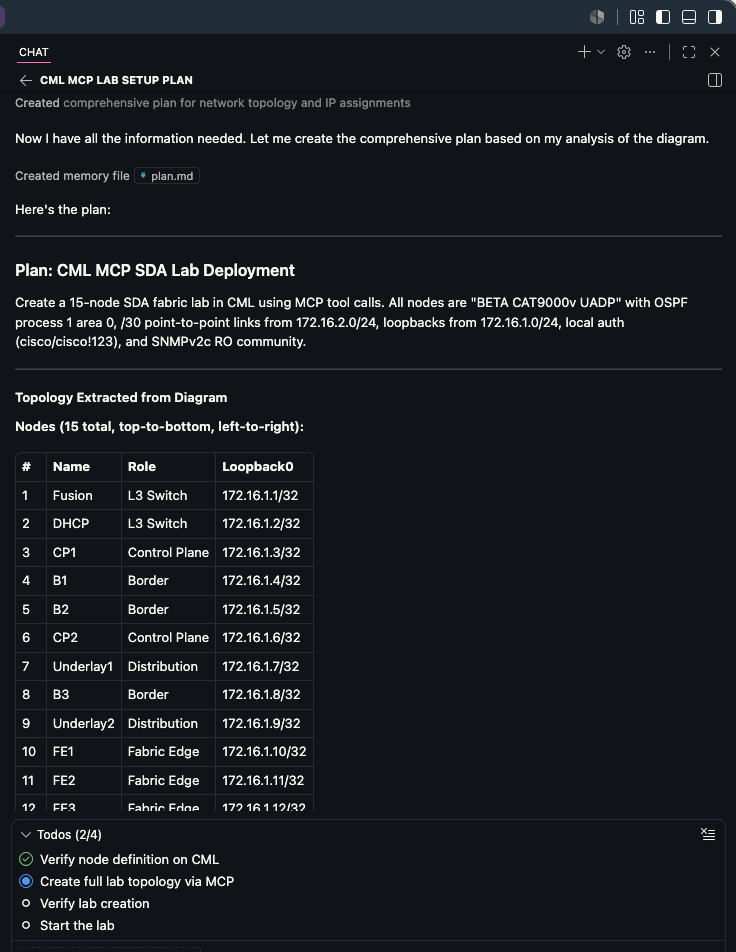
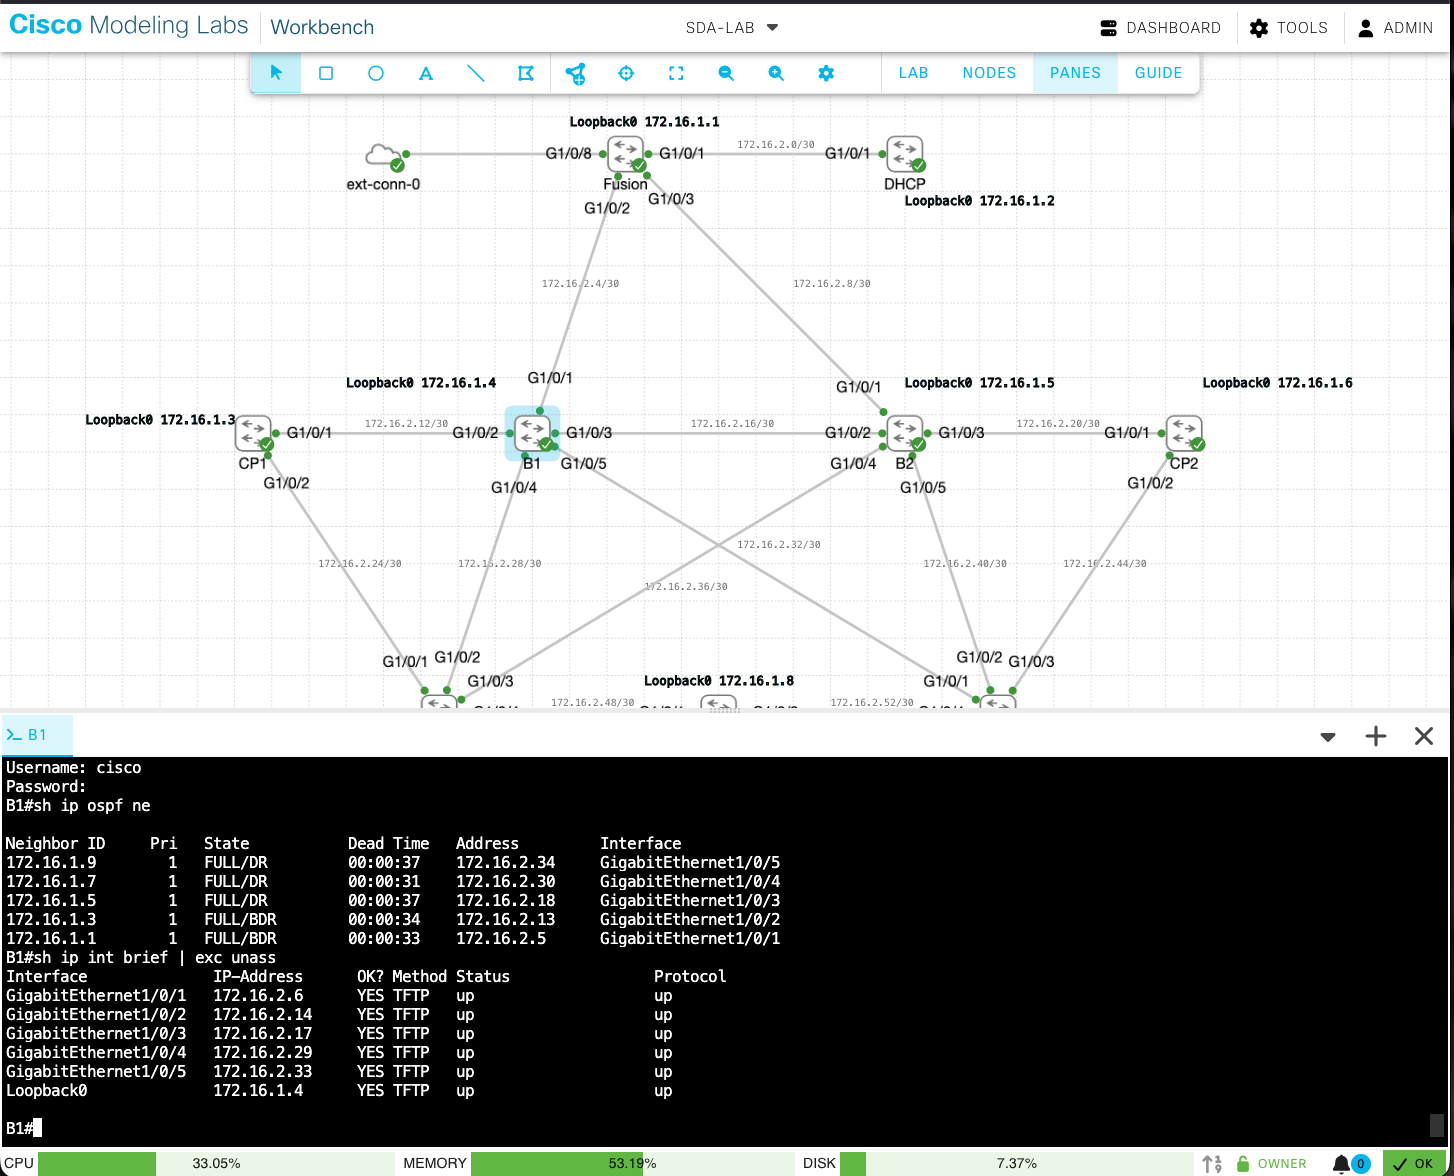
After Copilot finished deploying, it:
- Started all 15 nodes in the lab and waited for them to boot.
- Verified OSPF adjacencies — using PyATS to run
show ip ospf neighboracross devices and confirm full mesh adjacency. - Annotated the CML topology — added text labels showing Loopback 0 IP addresses on each node and subnet labels on point-to-point links.
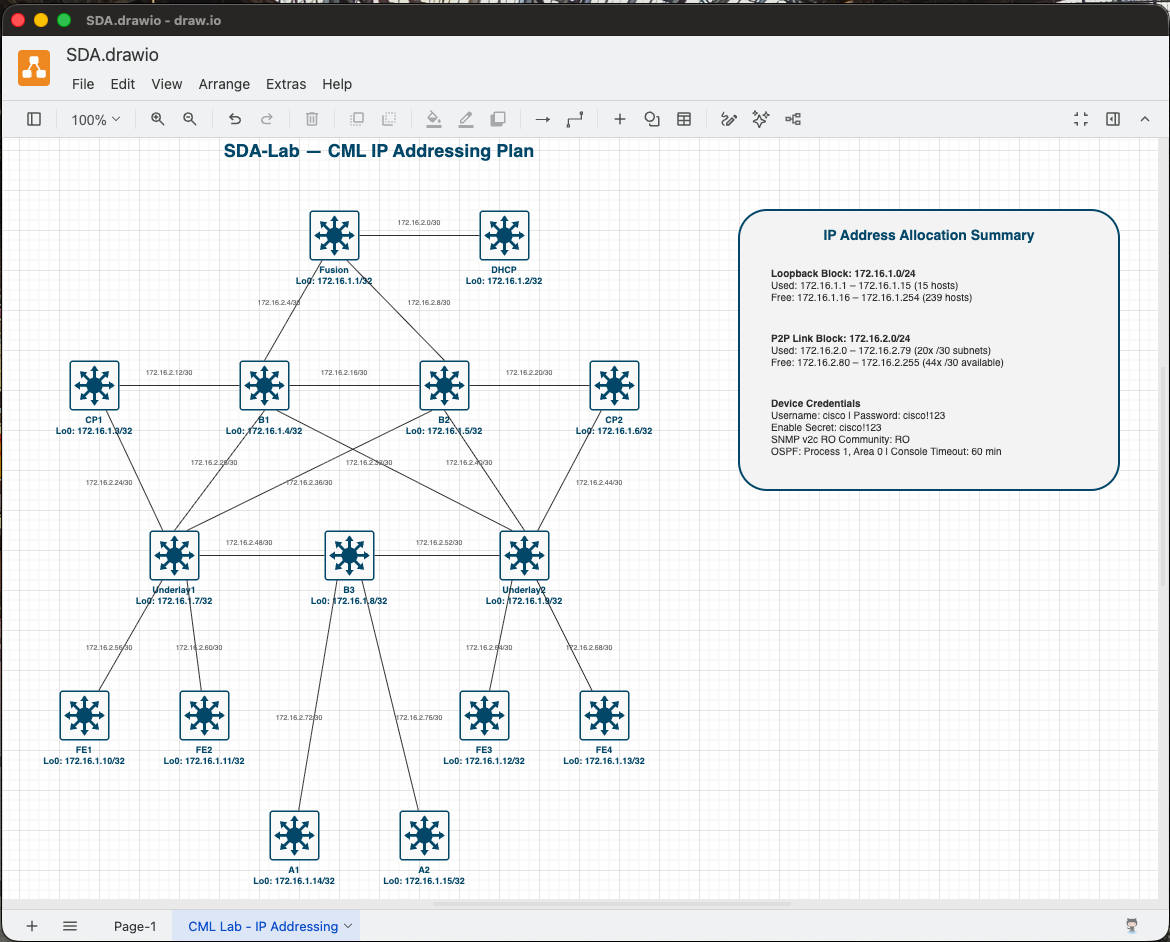
- Generated documentation — created a second page in the draw.io file with a complete IP addressing summary including:
- Loopback block: 172.16.1.0/24 (used: .1–.15, free: .16–.254)
- P2P link block: 172.16.2.0/24 (used: 20x /30 subnets, free: 172.16.2.80–.255)
- Device credentials and protocol summary
The topology deployed:
| Role | Nodes | Description |
|---|---|---|
| Fusion | 1 | Top-of-fabric aggregation |
| DHCP | 1 | DHCP services |
| Border (B1, B2, B3) | 3 | Fabric border nodes |
| Control Plane (CP1, CP2) | 2 | SDA control plane |
| Underlay (UL1, UL2) | 2 | Underlay distribution |
| Fabric Edge (FE1–FE4) | 4 | Fabric edge switches |
| Access (A1, A2) | 2 | Access layer |
| Total | 15 nodes, 20 links |
Summary
The combination of VS Code, GitHub Copilot, and the cml-mcp server transforms CML from a manual lab tool into an AI-driven, programmable lab provisioning system. The workflow is simple:
- Draw your topology in draw.io (this is your source of truth).
- Describe what you want in natural language.
- Watch MCP build, configure, and verify — hands-free.
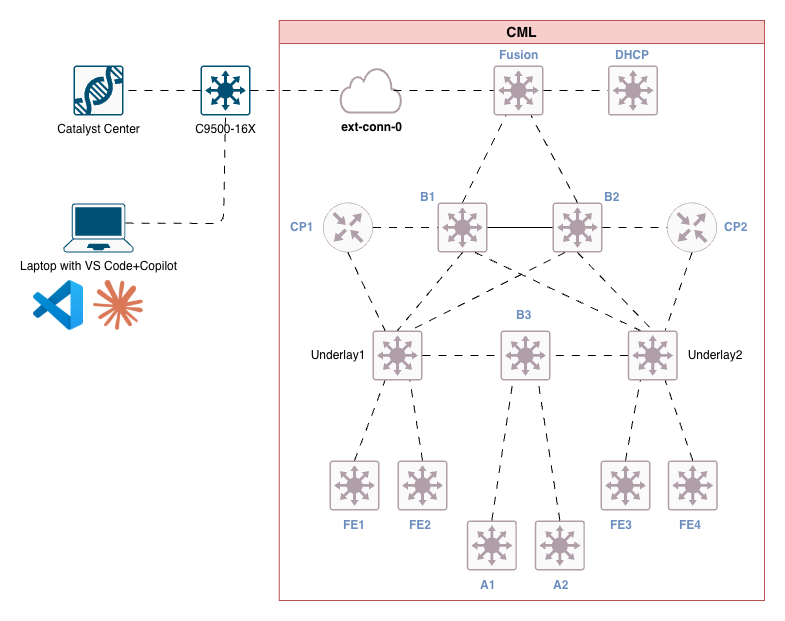
Why this matters beyond the lab: The real goal here isn’t just to build a topology faster — it’s to get the underlay ready so that a physical Catalyst Center (outside of CML) can discover and provision these simulated devices into a full SDA fabric. MCP handles the tedious groundwork — IP reachability, OSPF adjacencies, SNMP community strings, and local credentials — so that when Catalyst Center reaches into the CML environment, the devices are already network-reachable and manageable. CML supports both the CAT9000v UADP and Silicon One (Q200) silicon simulations, giving you realistic switch behaviour for fabric testing without physical hardware.
This approach isn’t limited to SDA underlays — any CML topology you can draw, you can deploy this way. OSPF labs, BGP labs, DMVPN, EVPN-VXLAN — if CML supports the node type, MCP can provision it.
A huge thanks to Joe Clarke (@xorrkaz) and the contributors for building cml-mcp — 51 tools, open-source (BSD-2), and actively maintained.
Please reach out if you have any questions or comments.