Cisco Live WLC Web Monitoring App
During the recent Cisco Live Melbourne 2023. I was involved in the Cisco NOC (Network Operations) teams. We were tasked to bring our own (bump in) Cisco Networking infrastructure to the MCEC (Melbourne Convention and Exhibition Centre).
We needed a tool to help track AP deployment from our phones, rather than connecting from our laptop to the WLC to check progress and perform health checks.
In this blog, I will discuss the tool I had built to help us track Access Points deployment, and monitor the health of Wireless LAN controller. The Flask App can be easily adapted for other purposes, as it present the information in a web page format.
Items used
- Python - was the work horse, I used it extract data from WLC (netmiko), then parse the data into list of dictionary - I made a textfsm version (probably next blog)
- Flask Python class - Use to create our WSGI (Web Server Gateway Interface) application, which renders a dynamic web page - using templates and the data extracted from the WLC.
- Gunicorn - Flask should not be used alone in production environment since it is a web framework and not a web server. Gunicorn takes the WSGI Application and present it as a web service.
- NGINX - public handler (reverse proxy) for incoming requests and scales to thousands of simultaneous connections.
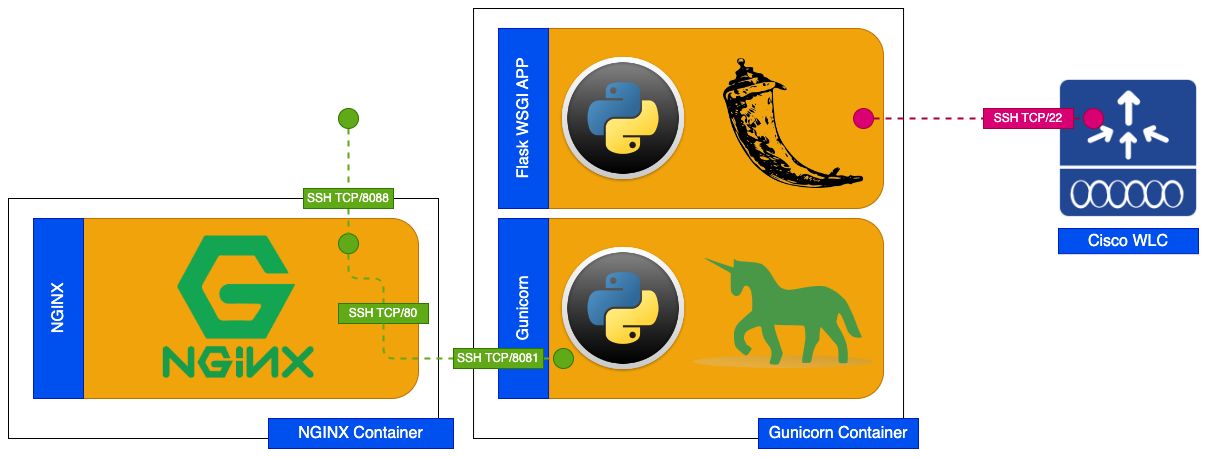
We then nicely package it all together with two docker containers:
- Gunicorn container - has Gunicorn with the Flask App. Exposes TCP/8081
- NGINX container - providing reverse proxy for the Gunicorn container. Exposes TCP/8088 externally and maps it to port TCP/80 internally in the container.
Most of the work is done within the Flask WSGI App by establishing an SSH session to the WLC using Netmiko Library. Depending on the web query, it would proceed to collect and parse the following command outputs:
- show ap summary
- show ap summary sort descending client-count
- show ap summary sort descending data-usage
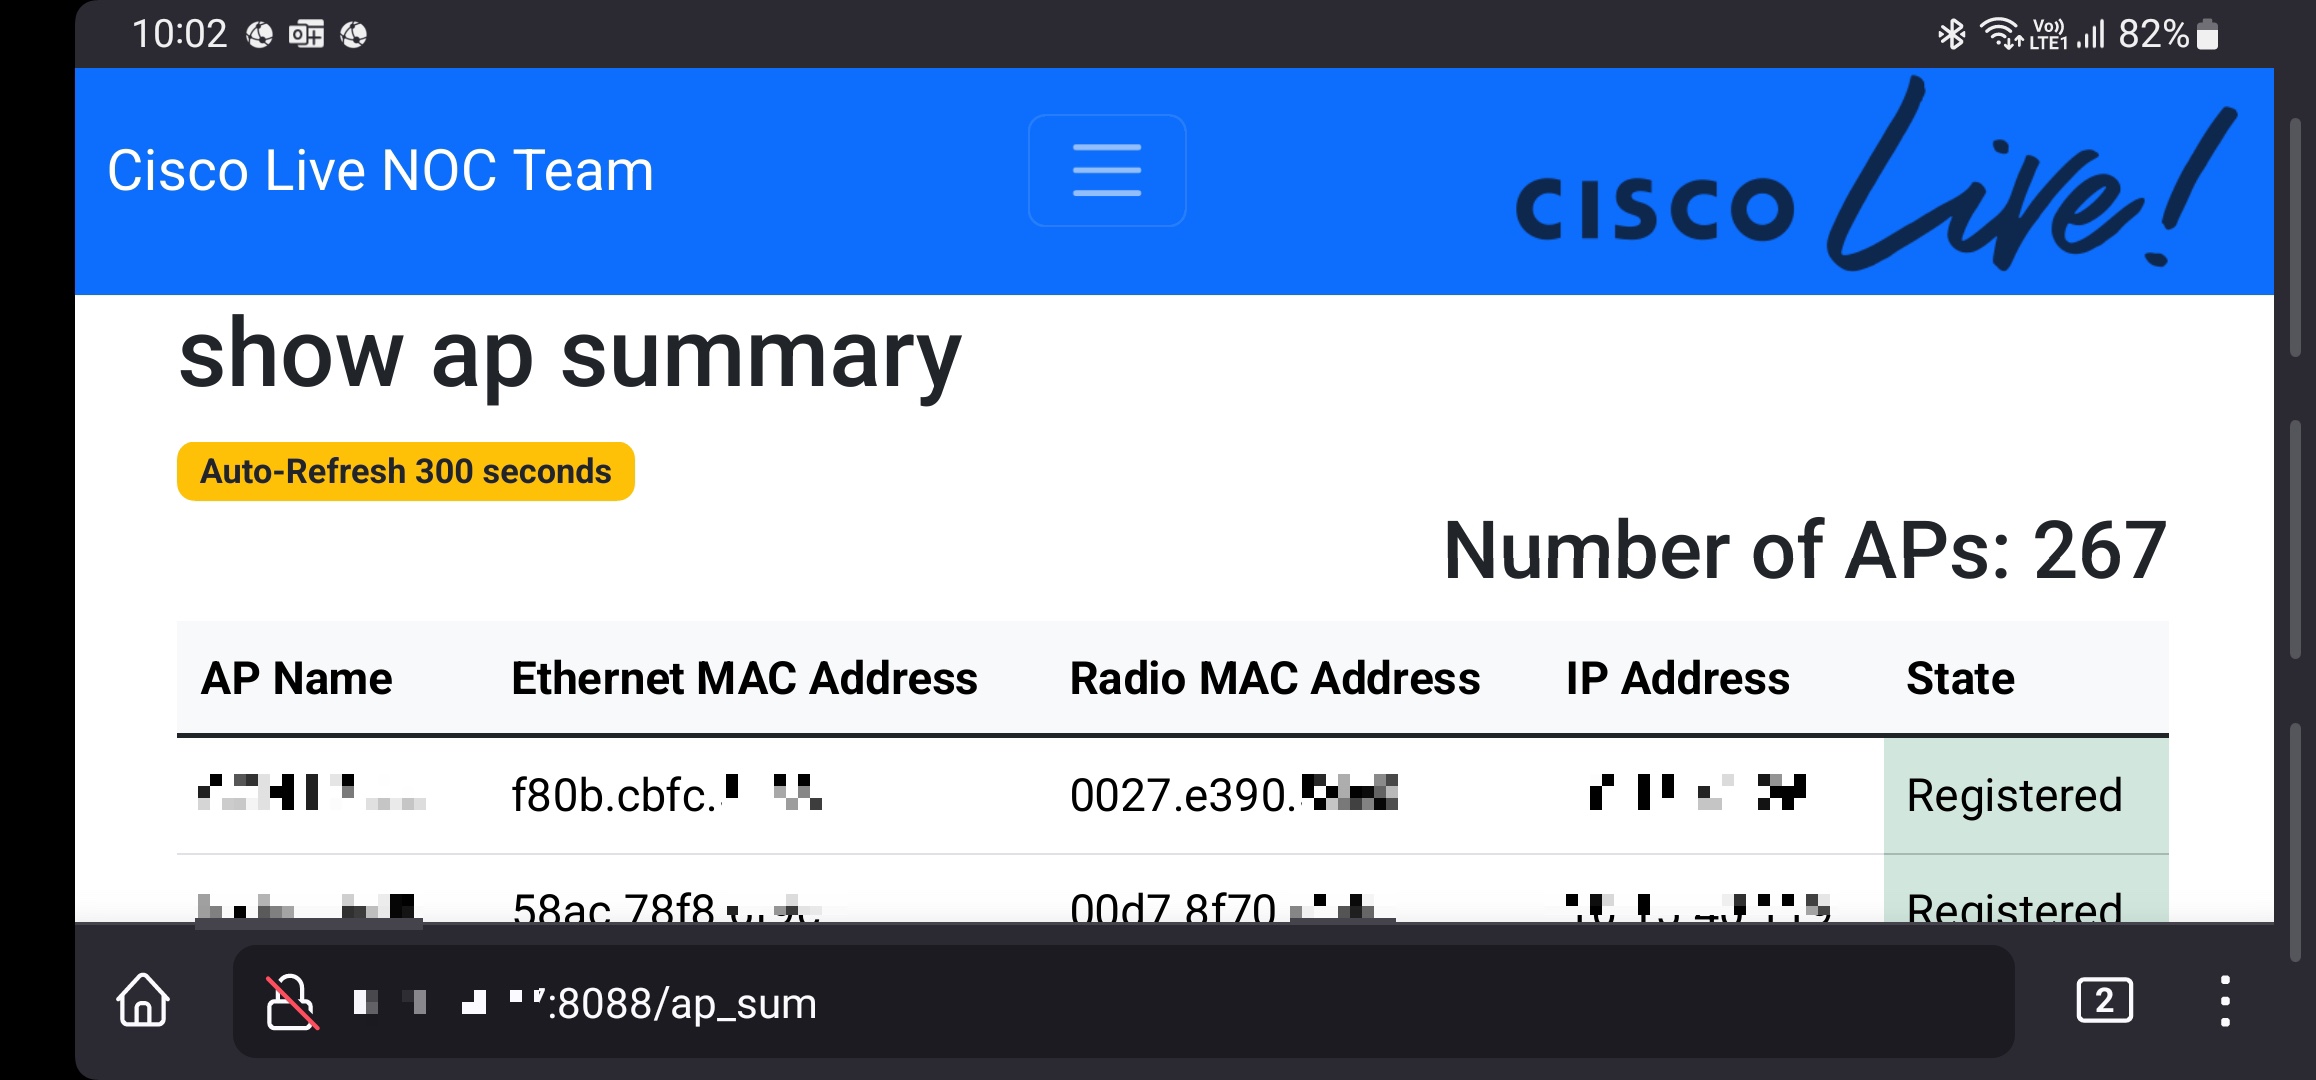
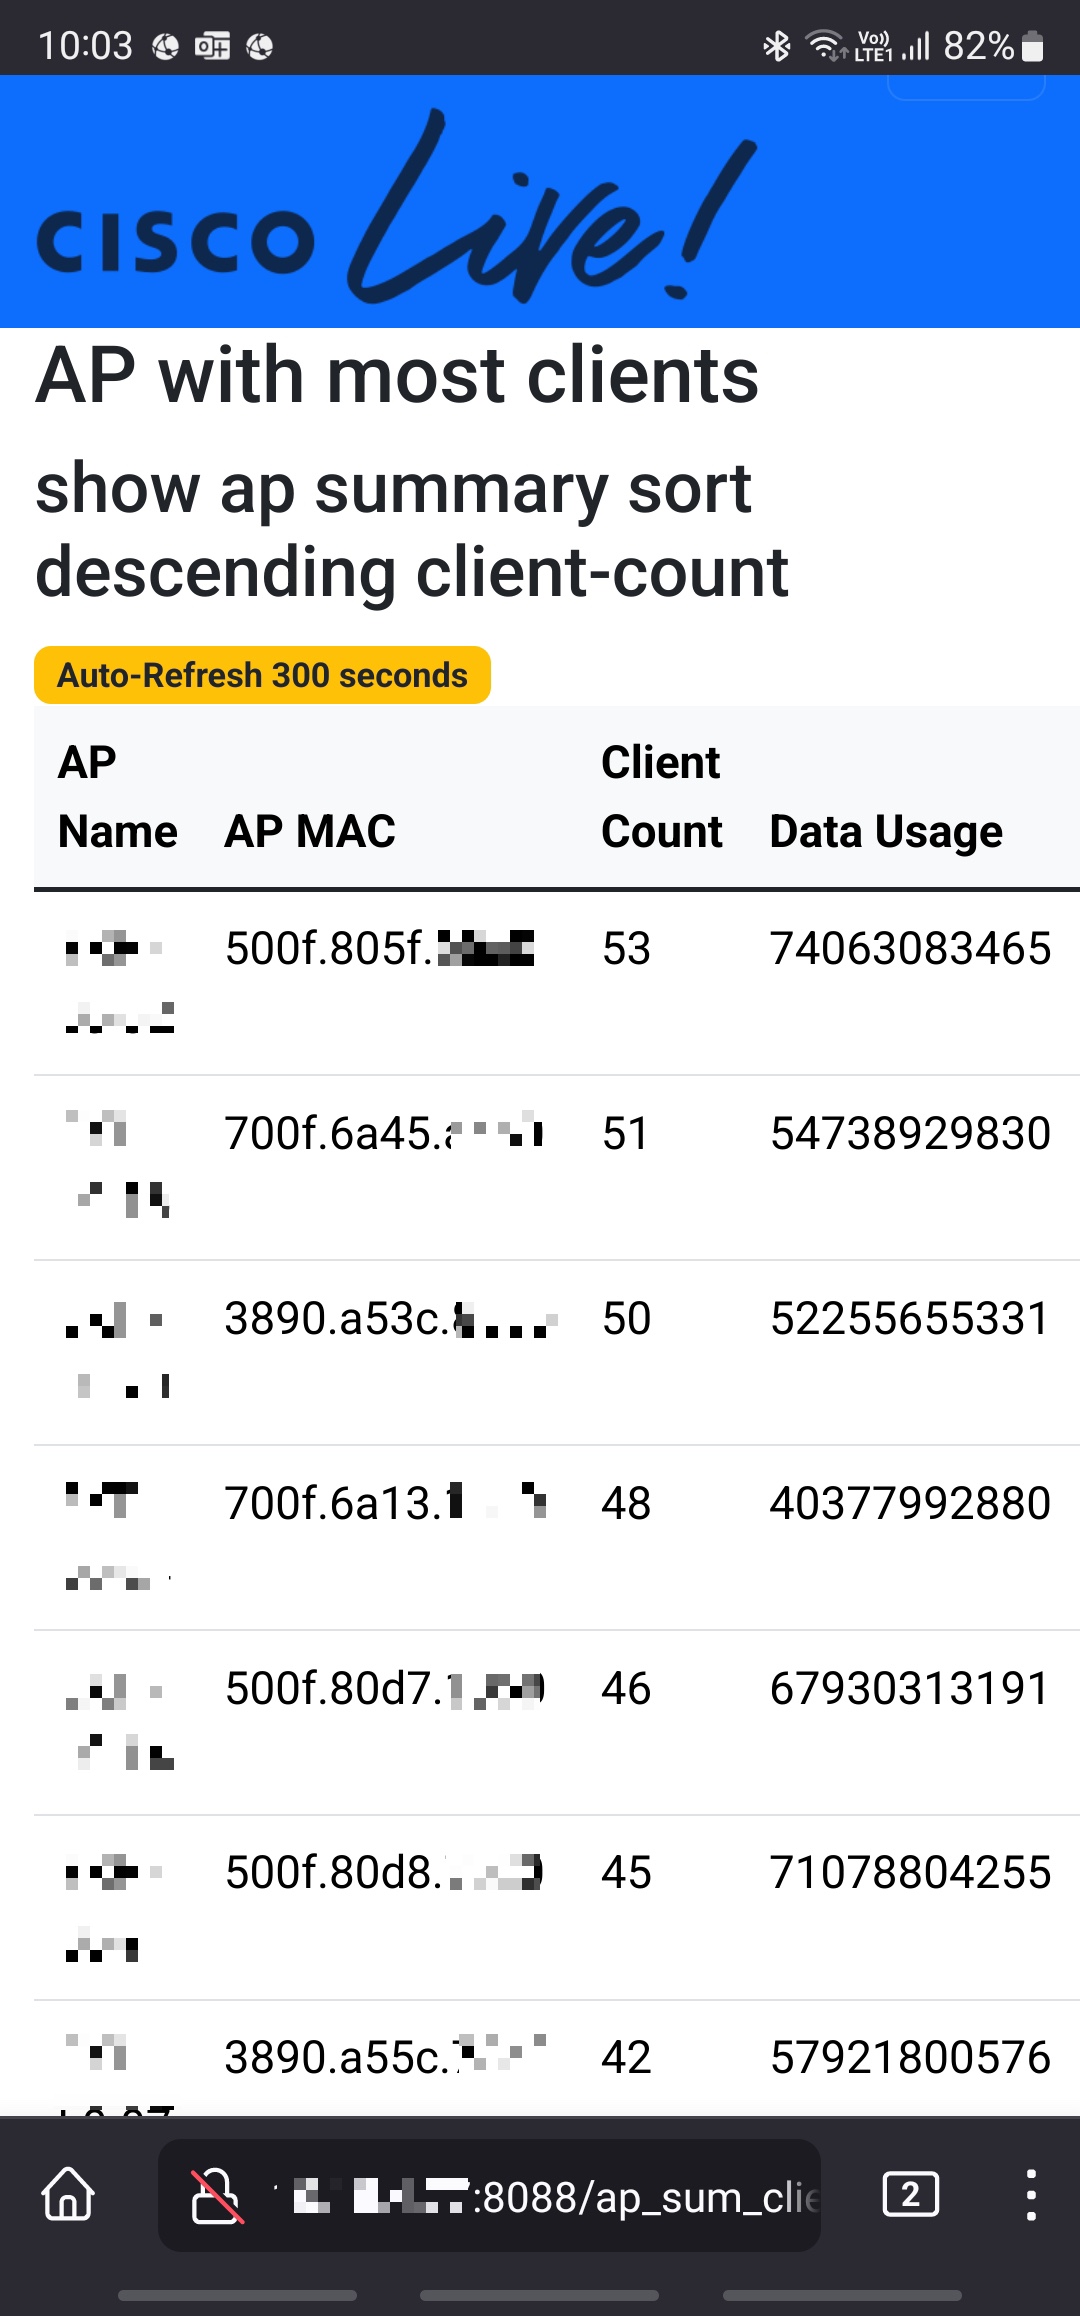
Please Note: Images below has their AP name, IP address, and Mac address pixelated.
Some screenshots from mobile device in landscape and portrait mode.


Before we begin to break down the code - you can grab a copy from GitHub - CiscoLive_WLC_Flask
Code break down
Analysis of app.py - Flask WSGI App
Python file app.py has some hardcoded username and password not best practice - this post was more about demonstrating functionality. These credentials are used by the netmiko to connect to the WLC.
The function grab_cli_output collects show commands from the WLC and returns output to anouther function that called it.
1
2
3
4
5
6
7
8
9
10
11
12
13
14
15
16
17
18
19
20
21
22
from flask import Flask, render_template, send_from_directory
from netmiko import ConnectHandler
import os

app = Flask(__name__)

def grab_cli_output(cli):
    wlc = {
        'device_type': 'cisco_wlc',
        'ip': '192.168.1.1',
        'username': 'admin',
        'password': 'cisco123',
        'secret': 'cisco123',
    }
    # Connect to the WLC
    net_connect = ConnectHandler(**wlc)
    net_connect.enable()
    output = net_connect.send_command(cli)
    # Disconnect from the WLC
    net_connect.disconnect()

    return output
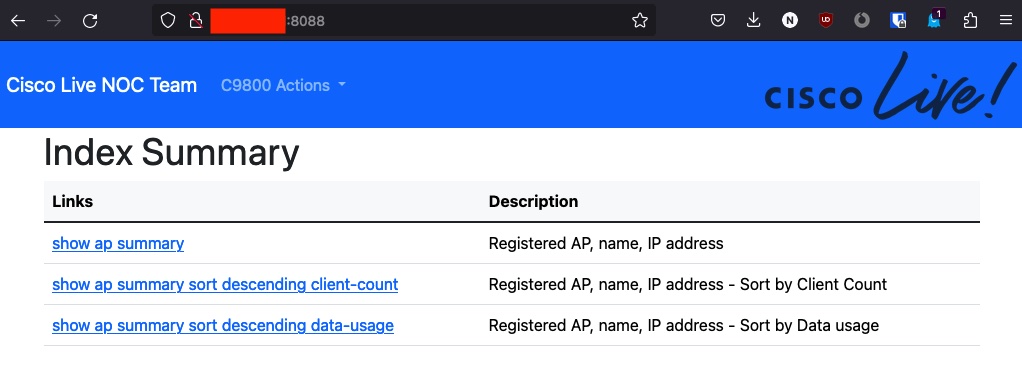
A number of flask route has been created. This determines how the Flask WSGI App should treat the incoming http request.
| Route | Command | Description |
|---|---|---|
| ”/” | Index of all available commands. | |
| “/ap_sum” | show ap summary | show total amount AP and their status. |
| “/ap_sum_client” | show ap summary sort descending client-count | show AP with most client |
| “/ap_sum_data” | show ap summary sort descending data-usage | show AP with most data usage |
Once the Flask WSGI APP recieves the request for a particular route it will trigger a called particular function.
For example, if it receives a request for http://x.x.x.x:8081/ap_sum it will be routed to line 6 below. The App will collect and parse the “show ap summary” from the configured WLC, it will then pass the parse values to the template to be rendered.
1
2
3
4
5
6
7
8
9
10
11
12
13
14
15
16
17
18
19
20
21
22
23
24
25
26
27
28
29
30
31
32
33
34
35
36
37
38
39
40
41
42
43
44
@app.route('/')
def index():
    return render_template('index.html')

# show ap summary
@app.route('/ap_sum')
def show_ap_summary():
    output = grab_cli_output('show ap summary')
    # Split the command output into lines
    lines = output.splitlines()
    # Grab total APs
    total_ap = lines[0]

    # Remove all lines to the actual AP listing
    # Staging-9800-CL#show ap summary
    # Number of APs: 1

    # CC = Country Code
    # RD = Regulatory Domain

    # AP Name                          Slots AP Model             Ethernet MAC   Radio MAC      CC   RD   IP Address                                State        Location
    # ---------------------------------------------------------------------------------------------------------------------------------------------------------------------
    # CW9166_LOANER                    3     CW9166I-Z            6849.9263.a160 ac2a.a1a6.90c0 AU   -Z   10.66.128.225                             Registered   default location
    lines = lines[7:]

    # Parse the AP details
    ap_details = []
    for line in lines:
        ap_info = line.split()
        ap_details.append({
            'ap_name': ap_info[0],
            'slots': ap_info[1],
            'ap_model': ap_info[2],
            'ether_mac': ap_info[3],
            'radio_mac': ap_info[4],
            'country_code': ap_info[5],
            'radio_domain': ap_info[6],
            'ip_address': ap_info[7],
            'state': ap_info[8],
            'location': ap_info[9]
        })

    # Render the template with the AP details
    return render_template('ap_summary.html', ap_details=ap_details, total_ap=total_ap)
Template break down
The template uses a combination of CSS boostrap template and variables (ap_details and total_ap) passed in from our app.py
Analysis of ap_summary.html
<!DOCTYPE html>
<html>
<head>
    <meta charset="utf-8">
    <meta name="viewport" content="width=device-width, initial-scale=1">
    <title>AP Summary</title>
    <link href="https://cdn.jsdelivr.net/npm/bootstrap@5.3.2/dist/css/bootstrap.min.css" rel="stylesheet" integrity="sha384-T3c6CoIi6uLrA9TneNEoa7RxnatzjcDSCmG1MXxSR1GAsXEV/Dwwykc2MPK8M2HN" crossorigin="anonymous">
</head>
<body>
    <div class="container-md">
    <h1>show ap summary</h1>
    <h2 class="text-end">{{ total_ap }}</h2>
    <table class="table table-hover">
        <tr>
            <thead class="table-light">
            <th>AP Name</th>
            <th>Ethernet MAC Address</th>
            <th>Radio MAC Address</th>
            <th>IP Address</th>
            <th>State</th>
        </tr>
    <tbody class="table-group-divider">
        {% for ap in ap_details %}
        <tr>
            <td>{{ ap.ap_name }}</td>
            <td>{{ ap.ether_mac }}</td>
            <td>{{ ap.radio_mac }}</td>
            <td>{{ ap.ip_address }}</td>
            <td {% if ap.state == 'Registered' %} class="table-success" {% endif %}> {{ ap.state }} </td>
        </tr>
        {% endfor %}
    </table>
    <script src="https://cdn.jsdelivr.net/npm/bootstrap@5.3.2/dist/js/bootstrap.bundle.min.js" integrity="sha384-C6RzsynM9kWDrMNeT87bh95OGNyZPhcTNXj1NW7RuBCsyN/o0jlpcV8Qyq46cDfL" crossorigin="anonymous"></script>
</div>
</body>
</html>
Docker and config files break down
The Github repo - GitHub - CiscoLive_WLC_Flask has the following file and directory structure. It is broken into two folders -
- gunicorn-flask-python-app - contains all the flask/gunicorn/templates files as well as the main app.py file. It also has the dockerfile to build the image.
- nginx - contains the nginx config file and dockerfile to build the image
docker-compose.yml on the top has the details for docker to spin up both containers.
File and Directory structure:
.
├── docker-compose.yml
├── gunicorn-flask-python-app
│   ├── app.py
│   ├── dockerfile
│   ├── gunicorn_config.py
│   ├── requirements.txt
│   ├── static
│   │   ├── CiscoLive-text.png
│   │   └── favicon.ico
│   └── templates
│       ├── ap_summary_client_count.html
│       ├── ap_summary_data_usage.html
│       ├── ap_summary.html
│       └── index.html
└── nginx
    ├── dockerfile
    └── nginx.conf

4 directories, 13 files
Gunicorn Flask
Analysis of Gunicorn/Flask dockerfile
1
2
3
4
5
6
7
8
9
# Python + Flask + Gunicorn
FROM python:slim
COPY requirements.txt /
RUN pip3 install --upgrade pip
RUN pip3 install -r /requirements.txt
COPY . /app
WORKDIR /app
EXPOSE 8081
CMD ["gunicorn", "--workers", "4", "--bind", "0.0.0.0:8081", "app:app"]
Gunicorn Flask image will be built based on python slim image, the app.py file will be copy into the image and the default CMD for gunicorn with IP address bounded to port 8081, will be applied to the app.py application.
Nginx
Analysis of nginx.conf
1
2
3
4
5
6
7
8
9
10
11
12
13
14
15
16
17
18
upstream flask_gunicorn {
    server flask-gunicorn-python-app:8081;
    # flask-gunicorn-python-app should match the container name in the docker compose file
}

server {

    listen 80;
    # nginx will run on port 80
    # docker compose should map to 80 from outside - ports: "8088:80"

    location / {
        proxy_pass http://flask_gunicorn;
        proxy_set_header X-Forwarded-For $proxy_add_x_forwarded_for;
        proxy_set_header Host $host;
        proxy_redirect off;
    }
}
Line 2 - nginx points to the flask-gunicorn-python-app container on port 8081
Line 8 - nginx will listen on port 80 - I will use docker-compose file to map this to 8088
line 13 - points to the upstream server that was defined in line 1
1
2
3
4
FROM nginx:latest

RUN rm /etc/nginx/conf.d/default.conf
COPY nginx.conf /etc/nginx/conf.d
Nginx image will be built from the nginx latest, we remove the default config and will be using the config file that we just went through.
Putting it all together
Use the following docker command below to start the build of the images and to bring up the containers.
> ls
docker-compose.yml  gunicorn-flask-python-app  nginx
> docker-compose up -d --build
Creating network "CiscoLive" with driver "bridge"
Building flask
DEPRECATED: The legacy builder is deprecated and will be removed in a future release.
            Install the buildx component to build images with BuildKit:
            https://docs.docker.com/go/buildx/

Sending build context to Docker daemon  65.02kB
Step 1/8 : FROM python:slim
 ---> c7fb57790594
Step 2/8 : COPY requirements.txt /
 ---> Using cache
 ---> 137ceec40163
Step 3/8 : RUN pip3 install --upgrade pip
 ---> Using cache
 ---> 5562af3d2e2f
Step 4/8 : RUN pip3 install -r /requirements.txt
 ---> Using cache
 ---> 00c652a77573
Step 5/8 : COPY . /app
 ---> e575d2224b76
Step 6/8 : WORKDIR /app
 ---> Running in bddfcad01138
Removing intermediate container bddfcad01138
 ---> b20e57eb5952
Step 7/8 : EXPOSE 8081
 ---> Running in 4190f2fea752
Removing intermediate container 4190f2fea752
 ---> 6d08da0fe87d
Step 8/8 : CMD ["gunicorn", "--workers", "4", "--bind", "0.0.0.0:8081", "app:app"]
 ---> Running in 82a06c669964
Removing intermediate container 82a06c669964
 ---> 207551f6c747
Successfully built 207551f6c747
Successfully tagged flask-gunicorn-python-app:latest
Building nginx
DEPRECATED: The legacy builder is deprecated and will be removed in a future release.
            Install the buildx component to build images with BuildKit:
            https://docs.docker.com/go/buildx/

Sending build context to Docker daemon  3.072kB
Step 1/3 : FROM nginx:latest
 ---> a8758716bb6a
Step 2/3 : RUN rm /etc/nginx/conf.d/default.conf
 ---> Using cache
 ---> 11f23ab98880
Step 3/3 : COPY nginx.conf /etc/nginx/conf.d
 ---> Using cache
 ---> f709a55cb997
Successfully built f709a55cb997
Successfully tagged nginx-app:latest
Creating flask-gunicorn-python-app ... done
Creating nginx-app                 ... done
If you made changes to the app.py file after you kick off the docker-compose, and want to utilise the change. Then do the following to stop the containers and clean up the image before starting the containers again.
> docker-compose down --rmi all
Stopping flask-gunicorn-python-app ... done
Stopping nginx-app                 ... done
Removing flask-gunicorn-python-app ... done
Removing nginx-app                 ... done
Removing network CiscoLive
Removing image flask-gunicorn-python-app
Removing image nginx-app
Summary
This app can be adapted for many devices and different commands, just use the similiar frame work. Anyway have fun playing with it.
Please reach out if you have any questions or comments.


