Python Flask Webhook Receiver
Exploring the power of Python Flask. We will use Flask to act as a Webhook Receive and we will test firing webhooks notification at it via curl, python code and Cisco DNAC. Webhooks (Reverse API) is a way to send notification from one application to another application.
Python Flask has been configured to support HTTPS and user authentication.
Before we begin, some details about the Webhook Flask receiver. I modified the original source GitHub - cisco-en-programmability and fork the changes here. GitHub - Flask webhook receiver
I enabled authentication and allow it to be reachable from the external IP address of an Ubuntu VM (Ubuntu 20.04.2 LTS)
Important:
If you are playing along - remember to ‘pip3 install requirements.txt’. This will install the required libraries used by the python script.
Code break down
Analysis of flask_rx.py - Flask Webhook receiver
Python file flask_rx.py imports the value of the username and password from config.py. These credentials are used by the flask web server, as well as when you post webhook notification from the test_webhook.py.
You can customise the filename that is used to save all the received webhook notification, by changing the variable ‘save_webhook_output_file’ in flask_rx.py.
1
2
3
4
5
6
7
8
9
10
11
12
from config import WEBHOOK_USERNAME, WEBHOOK_PASSWORD
save_webhook_output_file = "all_webhooks_detailed.json"

app = Flask(__name__)

app.config['BASIC_AUTH_USERNAME'] = WEBHOOK_USERNAME
app.config['BASIC_AUTH_PASSWORD'] = WEBHOOK_PASSWORD

# If true, then site wide authentication is needed
app.config['BASIC_AUTH_FORCE'] = True

basic_auth = BasicAuth(app)
A number of flask route has been created - “/” and “/webhook”. This determines how the flask web service should treat the incoming request.
- ”/” is used to test if the web service is running.
- “/webhook” is used to post the webhook notification - so the full URL would be https://x.x.x.x/webhook . Once the webhook notification is received by flask, we use json.dumps to print it to the screen and as well as dump it to the file.
1
2
3
4
5
6
7
8
9
10
11
12
13
14
15
16
17
18
19
20
21
22
23
24
25
26
27
28
29
@app.route('/')  # create a route for / - just to test server is up.
@basic_auth.required
def index():
    return '<h1>Flask Receiver App is Up!</h1>', 200

@app.route('/webhook', methods=['POST'])  # create a route for /webhook, method POST
@basic_auth.required
def webhook():
    if request.method == 'POST':
        print('Webhook Received')
        request_json = request.json

        # print the received notification
        print('Payload: ')
        # Change from original - remove the need for function to print
        print(json.dumps(request_json,indent=4))

        # save as a file, create new file if not existing, append to existing file
        # full details of each notification to file 'all_webhooks_detailed.json'
        # Change above save_webhook_output_file to a different filename

        with open(save_webhook_output_file, 'a') as filehandle:
            # Change from original - we output to file so that the we page works better with the newlines.
            filehandle.write('%s\n' % json.dumps(request_json,indent=4))
            filehandle.write('= - = - = - = - = - = - = - = - = - = - = - = - = - = - = - = - = - = - \n')

        return 'Webhook notification received', 202
    else:
        return 'POST Method not supported', 405
We use the app.run to specified the port 5443, HTTPS and to bind Flask to all IP addresses on the Ubuntu VM.
1
2
3
if __name__ == '__main__':
    # HTTPS enable - toggle on eby un-commenting
    app.run(ssl_context='adhoc', host='0.0.0.0', port=5443, debug=True)
Test methodology
We will use three different method to test the Python Flask Webhook receiver
- Curl command to test fire a webhook subscription at the receiver,
- Use another Python code - test_webhook.py using the request.post fire the request
- On the Cisco DNAC, you can subscribe to many different types of event notifications and add external destination receiver to send these notifications to. Configure DNAC with the details of the webhook receiver and we can test fire from there.


Important:
Modify config.py to change the IP address in WEBHOOK_URL and TCP port to match your environment. Specify the IP address of the device running the Flask Python code.
WEBHOOK_URL is only used by python code test_webhook.py to emulate the notification transmitter.
Both test_webhook.py and flask_rx.py will use the WEBHOOK_USERNAME and WEBHOOK_PASSWORD values from config.py.
1
2
3
WEBHOOK_URL = 'https://172.16.1.16:5443/webhook'  # test with Flask receiver
WEBHOOK_USERNAME = 'username'
WEBHOOK_PASSWORD = 'password'
After starting
$ python3 flask_rx.py
Check if the Linux VM is listening on the port 5443.
$ sudo ss -tulpn
Netid  State   Recv-Q  Send-Q     Local Address:Port      Peer Address:Port  Process
. . . . SNIPPET . . . .
tcp    LISTEN  0       128              0.0.0.0:5443           0.0.0.0:*      users:(("python3",pid=400977,fd=4),("python3",pid=400977,fd=3),("python3",pid=400975,fd=3))
tcp    LISTEN  0       4096       127.0.0.53%lo:53             0.0.0.0:*      users:(("systemd-resolve",pid=327488,fd=13))
tcp    LISTEN  0       128              0.0.0.0:22             0.0.0.0:*      users:(("sshd",pid=81227,fd=3))
And Check if the firewall is not active.
$ sudo ufw status
Status: inactive
Firing a test from curl command
The curl command to emulate the notification transmission. The data is any payload - intent was to test functionality. You can customer the content of the dictionary after “–data”
Test done from my Mac
[pnhan@PNHAN-M-1466 ~/Documents/Python/webhook]$ curl --insecure --user "username:password" --header "Content-Type: application/json" --request POST --data '{"Testing_Key":"Testing_Value"}' https://172.16.1.16:5443/webhook
Webhook notification received%
[pnhan@PNHAN-M-1466 ~/Documents/Python/webhook]$
Meanwhile, on the Ubuntu VM it was running flask_rx.py. It received the notification from our curl command - Note the payload is displayed.
cisco@ubuntu2:~/Python/webhook$ python3 flask_rx.py
 * Serving Flask app 'flask_rx' (lazy loading)
 * Environment: production
   WARNING: This is a development server. Do not use it in a production deployment.
   Use a production WSGI server instead.
 * Debug mode: on
 * Running on all addresses.
   WARNING: This is a development server. Do not use it in a production deployment.
 * Running on https://172.16.1.16:5443/ (Press CTRL+C to quit)
 * Restarting with stat
 * Debugger is active!
 * Debugger PIN: 768-531-813
Webhook Received
Payload:
{
    "Testing_Key" : "Testing_Value"
}
172.16.1.20 - - [22/May/2021 21:10:23] "POST /webhook HTTP/1.1" 202 -
Firing a test from test_webhook.py command
Test done from my Mac but using the test_webhook.py - note it has some pre-defined payload
[pnhan@PNHAN-M-1466 ~/Documents/Python/webhook]$ python3 test_webhook.py
Webhook notification status code:  202
Webhook notification response:  Webhook notification received
Meanwhile, on the Ubuntu VM it was running flask_rx.py. It received the notification from test_webhook.py - Note the payload is displayed.
cisco@ubuntu2:~/Python/webhook$ python3 flask_rx.py
 * Serving Flask app 'flask_rx' (lazy loading)
 * Environment: production
   WARNING: This is a development server. Do not use it in a production deployment.
   Use a production WSGI server instead.
 * Debug mode: on
 * Running on all addresses.
   WARNING: This is a development server. Do not use it in a production deployment.
 * Running on https://172.16.1.16:5443/ (Press CTRL+C to quit)
 * Restarting with stat
 * Debugger is active!
 * Debugger PIN: 768-531-813
Webhook Received
Payload:
{
    "version" : "" ,
    "instanceId" : "ea6e28c5-b7f2-43a4-9937-def73771c5ef" ,
    "eventId" : "NETWORK-NON-FABRIC_WIRED-1-251" ,
    "namespace" : "ASSURANCE" ,
    "name" : "" ,
    "description" : "" ,
    "type" : "NETWORK" ,
    "category" : "ALERT" ,
    "domain" : "Connectivity" ,
    "subDomain" : "Non-Fabric Wired" ,
    "severity" : 1 ,
    "source" : "ndp" ,
    "timestamp" : 1574457834497 ,
    "tags" : "" ,
    "details" : {
        "Type" : "Network Device" ,
        "Assurance Issue Priority" : "P1" ,
        "Assurance Issue Details" : "Interface GigabitEthernet1/0/3 on the following network device is down: Local Node: PDX-M" ,
        "Device" : "10.93.141.17" ,
        "Assurance Issue Name" : "Interface GigabitEthernet1/0/3 is Down on Network Device 10.93.141.17" ,
        "Assurance Issue Category" : "Connectivity" ,
        "Assurance Issue Status" : "active"
    } ,
    "ciscoDnaEventLink" : "https://10.93.141.35/dna/assurance/issueDetails?issueId=ea6e28c5-b7f2-43a4-9937-def73771c5ef" ,
    "note" : "To programmatically get more info see here - https://<ip-address>/dna/platform/app/consumer-portal/developer-toolkit/apis?apiId=8684-39bb-4e89-a6e4" ,
    "tntId" : "" ,
    "context" : "" ,
    "tenantId" : ""
}
172.16.1.20 - - [22/May/2021 21:17:06] "POST /webhook HTTP/1.1" 202 -
Firing a test from Cisco DNAC
Add the webhook destination in DNAC

Add the credential of the webhook.
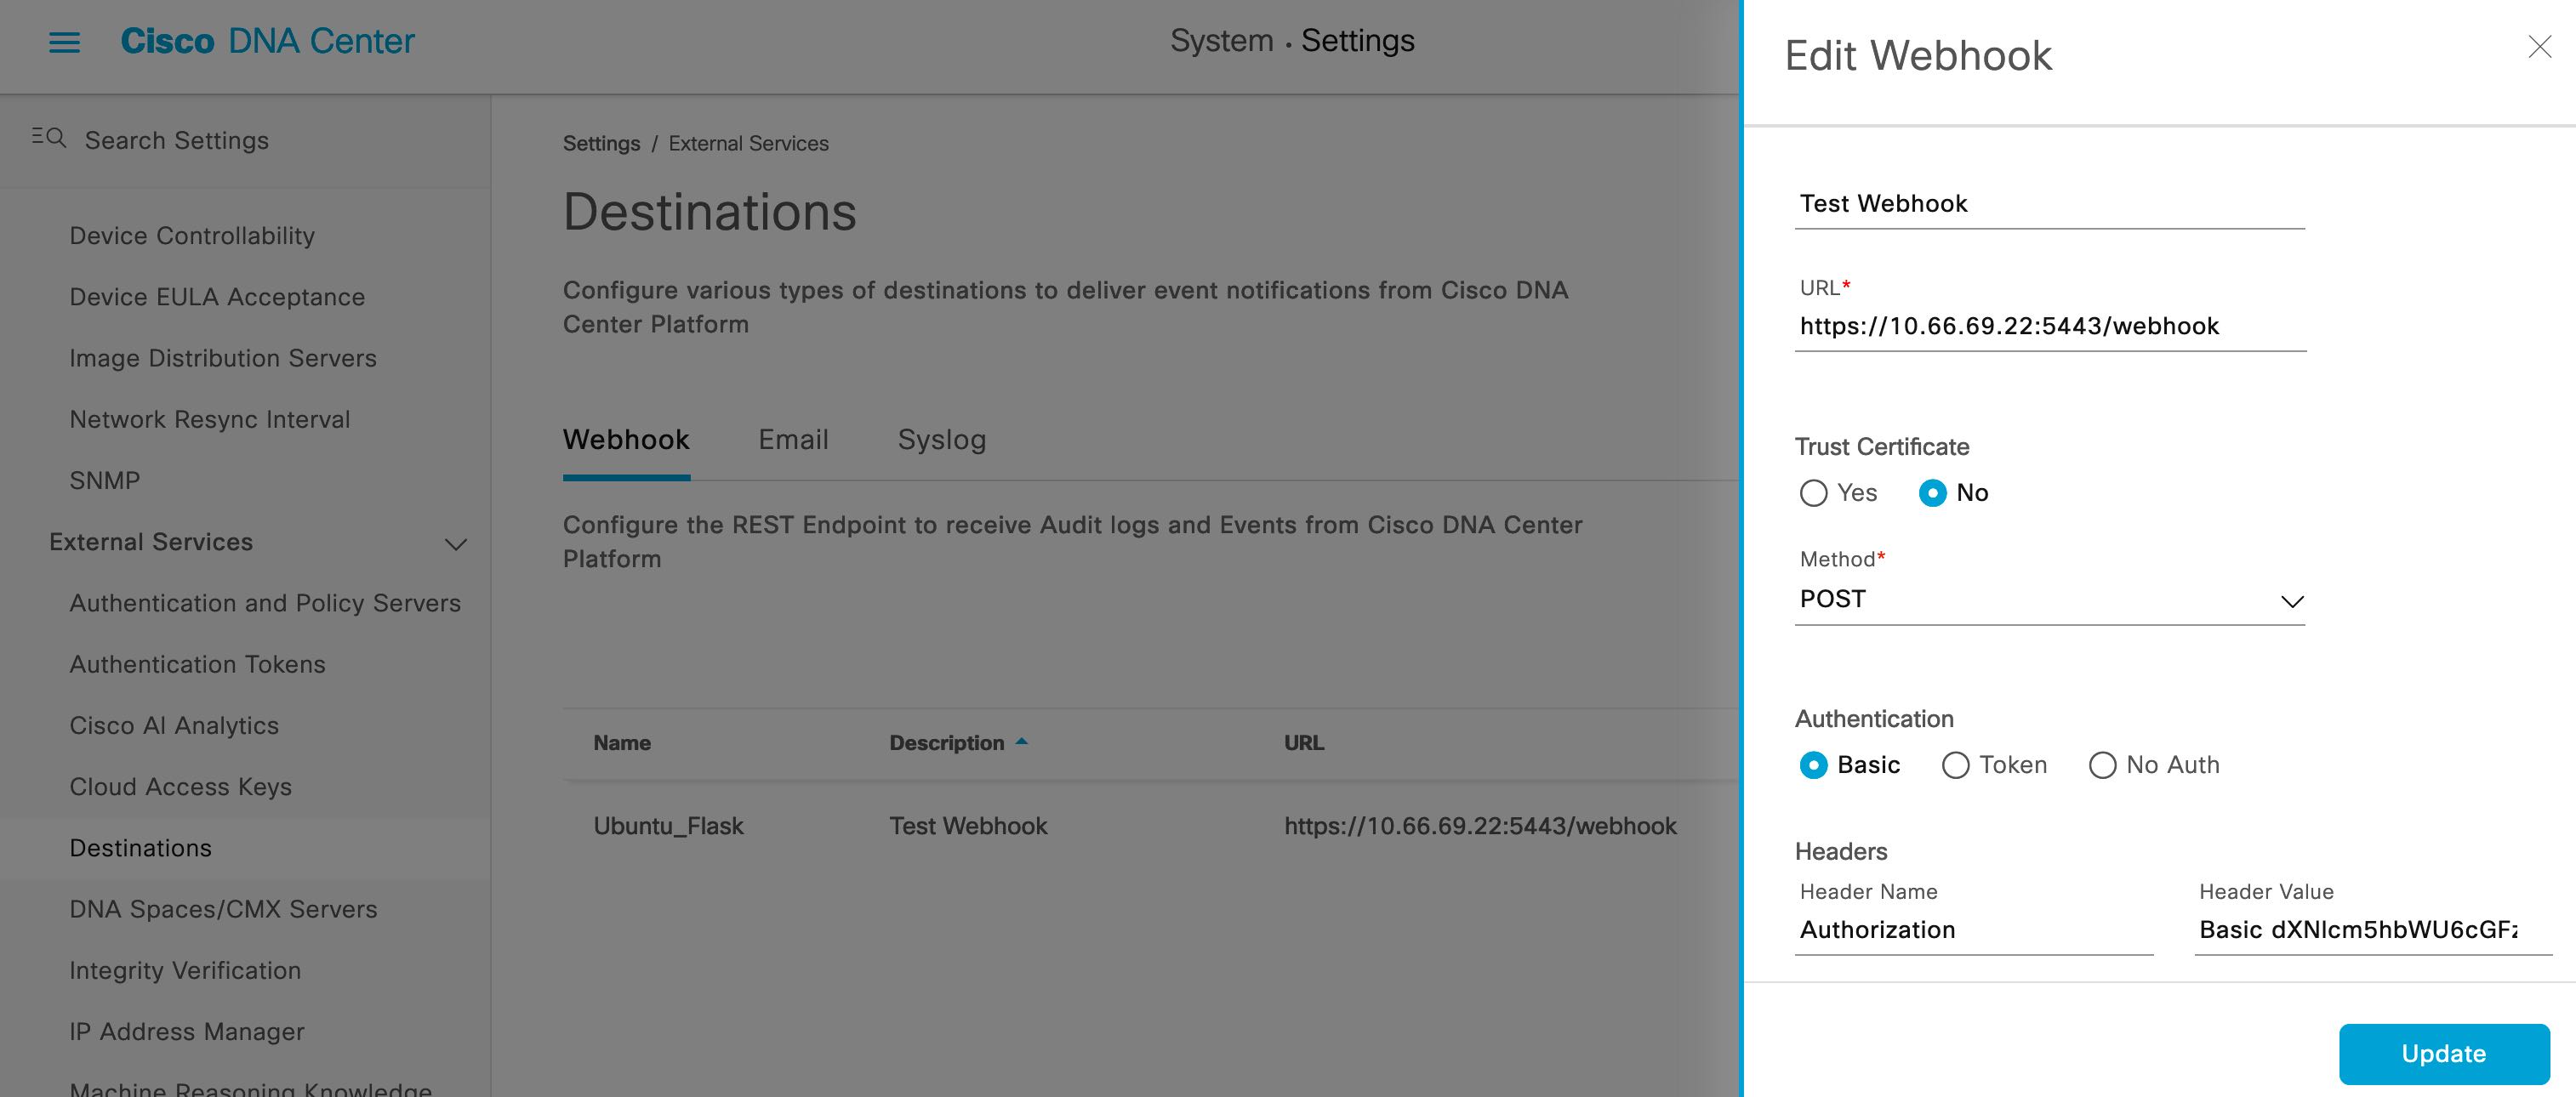
Important:
Note the Authorization headers is a Base64 encoding of username:password. If you need help with the Base64 encoding - I have included userpass_base64.py to help.
[pnhan@PNHAN-M-1466 ~/Documents/Python/webhook]$ python3 userpass_base64.py
Enter Username: username
Enter Password: password
username:password
Encoded string: dXNlcm5hbWU6cGFzc3dvcmQ=
Header for Basic Authentication
Authorization Header value: Basic dXNlcm5hbWU6cGFzc3dvcmQ=
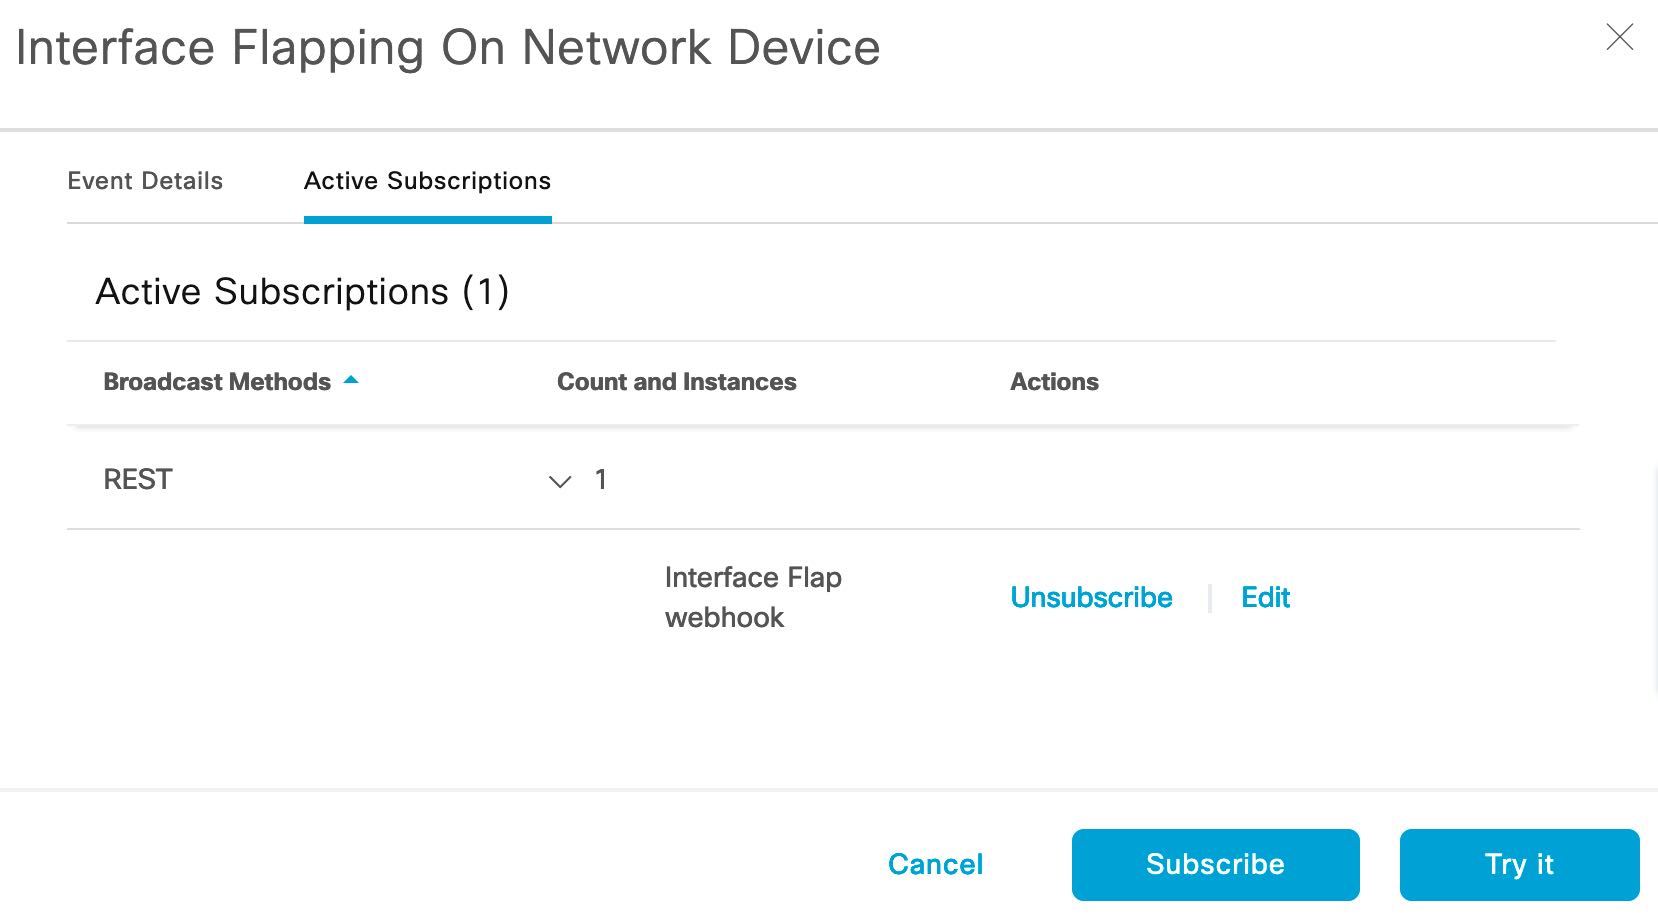
Subscribe to a notification and “Try it”
Meanwhile, on the Ubuntu VM it was running flask_rx.py. It received the notification from Cisco DNAC - Note the payload is displayed.
cisco@ubuntu2:~/Python/webhook$ python3 flask_rx.py
 * Serving Flask app 'flask_rx' (lazy loading)
 * Environment: production
   WARNING: This is a development server. Do not use it in a production deployment.
   Use a production WSGI server instead.
 * Debug mode: on
 * Running on all addresses.
   WARNING: This is a development server. Do not use it in a production deployment.
 * Running on https://172.16.1.16:5443/ (Press CTRL+C to quit)
 * Restarting with stat
 * Debugger is active!
 * Debugger PIN: 768-531-813
Webhook Received
Payload:
{
    "version" : "1.0.0" ,
    "instanceId" : "1fbf834f-b1ca-42cc-a845-67ce410bea0b" ,
    "eventId" : "NETWORK-DEVICES-3-210" ,
    "namespace" : "ASSURANCE" ,
    "name" : "Interface Flapping On Network Device" ,
    "description" : "A port interface is flapping on a switch" ,
    "type" : "NETWORK" ,
    "category" : "WARN" ,
    "domain" : "Know Your Network" ,
    "subDomain" : "Devices" ,
    "severity" : 3 ,
    "source" : "EXTERNAL" ,
    "timestamp" : 1621494721901 ,
    "details" : {
        "Type" : "" ,
        "Assurance Issue Details" : "Switch  Interface  is flapping" ,
        "Assurance Issue Priority" : "" ,
        "Device" : "" ,
        "Assurance Issue Name" : "Interface  is Flapping on Network Device " ,
        "Assurance Issue Category" : "" ,
        "Assurance Issue Status" : ""
    } ,
    "ciscoDnaEventLink" : "https://<DNAC_IP_ADDRESS>/dna/assurance/issueDetails?issueId=" ,
    "note" : "To programmatically get more info see here - https://<ip-address>/dna/platform/app/consumer-portal/developer-toolkit/apis?apiId=8684-39bb-4e89-a6e4" ,
    "context" : "EXTERNAL" ,
    "userId" : null ,
    "i18n" : null ,
    "eventHierarchy" : null ,
    "message" : null ,
    "messageParams" : null ,
    "parentInstanceId" : null ,
    "network" : null
}
10.66.50.14 - - [20/May/2021 17:12:02] "POST /webhook HTTP/1.1" 202 -
Summary
Flask is pretty powerful, with just a few lines of code you can have a fully functioning web server.
Coming Up Next: We will further explore ways of customising flask using template to get Maximum Impact with very little efforts. And we will continue the same theme of webhook but change the python code to show the content of the log file via the same Flask web service.
Please reach out if you have any questions or comments.